3.29.2011

the best zucchini bread in the world (seriously ... )

I have made this zucchini-pineapple quick bread at least 20 times. It's hands down my favorite healthy yet tender, sweet but not too sweet, filling breakfast – especially with a cup of hot coffee – or midday snack. The best part about it is that it keeps well in the fridge for about a week, and the second loaf freezes perfectly ... not that it ever lasts long there. The other good part about it is that it's a quick bread, which means there's no kneading, rolling, or general waiting/patience involved. My kind of bread.

This weekend my mom is coming in from out of town for a quick overnight trip and I wanted something yummy for breakfast while she's here. Zucchini bread to the rescue! I made it last weekend, and though it's only Tuesday, we've almost killed a whole loaf. We'll pull out the second loaf Friday night and have it ready for Saturday morning, lickity-split (just don't tell the hubs it's there ... ). Definitely mom-worthy. Here's how you make it:

Zucchini-pineapple Quick Bread (adapted from Cooking Light)
  •  3 cups sifted all-purpose flour (I use 1 1/2c whole-wheat pastry flour)
  • 1 teaspoon salt
  • 1 teaspoon baking soda
  • 1/2 teaspoon baking powder
  • 2 teaspoons ground cinnamon
  • 4  large eggs
  • 2  cups sugar
  • 2  cups grated zucchini (about 1 1/2 medium zucchini - yay, food processor play time!)
  • 2/3  cup canola oil (heart healthy!)
  • 2  teaspoons vanilla extract
  • 2  (8-ounce) cans crushed pineapple in 100% juice, drained
  1. Preheat oven to 325°.
  2. Lightly spoon flour into dry measuring cups, and level with a knife. Combine flour, salt, and next three ingredients (through ground cinnamon) in a large bowl, stirring well with a whisk.
  3. Beat eggs with a mixer at medium speed until foamy. Add sugar, zucchini, oil and vanilla, beating until well blended. Add zucchini mixture to flour mixture, stirring just until moist. Fold in pineapple. 
  4. Spoon batter into two (9 x 5–inch) loaf pans coated with baking spray. Bake at 325° for one hour to one hour and 15 minutes or until a wooden pick inserted in center comes out clean. Cool 10 minutes in pans on a wire rack; turn out from pans. Cool completely on wire rack.
Don't say I didn't warn you.

One last thing: here's a photo of this week's organic produce box. :)

3.28.2011

sunday brunchday

The weekends call for hot coffee and slow brunches that leave you too full to eat lunch or move off of the couch. The past two weekends have been filled with fun activities with friends and good exercise opportunities (as well as not-so-fun-yet-physcially-demanding-yardwork). So to honor the weekends, the last two have featured really yummy brunches. The first, Southwest egg burritos with black beans, salsa and sour cream, fueled a 3,000-yard swim. Cheeseandrice, it was good. The second, this past weekend, was oatmeal-cranberry pancakes – hearty, filling and tasty.

The best part was that these recipes were both made with healthy items we had on hand. And they each took less than 20 minutes, even with the flavor-oomph tortilla-charring and oatmeal cooking. Here are the secrets of the trade:

Oatmeal-Cranberry Griddle Cakes (adapted from Mark Bittman)
  • 1/4 c whole wheat flour
  • 1/4 c all-purpose flour
  • 1/4 rolled oats, dry
  • 1 tsp baking powder
  • 1 tsp cinnamon
  • 1 tsp pumpkin-pie spice
  • 1/2 tsp salt
  • 1 egg
  • 1 c milk
  • 2 cups left-over cooked and cooled* oatmeal
  • 1/2 cup dried cranberries or other fruit, fresh or dried (sliced bananas or blueberries would be really good)
  • Syrup or apple butter
  1. Preheat oven to 200. Combine flours, oats, baking powder, spices and salt in a large bowl. In a separate bowl, whisk the egg and milk until well blended; stir in cranberries and cooked oatmeal* until just incorporated. Add the oatmeal mixture to the flour mixture and stir gently, being sure not to overmix. It should look like thick pancake batter.
  2. Heat a large griddle over medium heat with a swirl of oil in the pan. Spoon the batter into little patties in the pan and cook two to three minutes on each side, flipping when bubbles form and the bottoms are slightly browned. Note: these do take a little longer to cook than regular pancakes, I think because of the moistness of the cooked oatmeal.
  3. Transfer them to the warm oven on a heat-safe plate, tented with foil. Serve with syrup or apple butter.
*If you don't have leftover oatmeal, then make 2 cups per the box instructions. When adding the hot oatmeal to the eggs, temper them by adding one small spoonful at a time and whisking until incorporated. Do this 3-4 times until the temperature of the eggs has risen slowly. This will prevent accidental scrambling your eggs from the heat (but on the upside, it's kind of a neat science experiment if it happens ... ).

Southwest Egg Burritos for Two (my own recipe)
  •  Two whole-wheat tortillas
  • 1/2 c cheese
  • 1/2 can black beans, drained and rinsed
  • 4 eggs
  • ~2 tbsp milk
  • 1/2 tsp each cumin and chile pepper
  • Handful of green onions or chives
  •  salt and pepper
  • Salsa, sour cream, cilantro and any other Southwest-style toppings that you like
  1. Heat a pan over medium heat and lightly coat it (use a oil spritzer if you can) with canola oil. Lay a tortilla in the pan and watch for it to bubble. Lift it ever so slightly. If there are darkish brown char marks, flip it and repeat on the other side. Repeat with one more tortilla. Put on plates and sprinkle with Mexican cheese (or colby-jack or cheddar).
  2. While this is happening, heat your drained and rinsed beans in a pot or in the microwave. In the now-empty, warm tortilla pan, scramble four eggs with a little milk. Season them with salt, pepper, about a 1/2 tsp. cumin and chile powder, each, and some green onion or chives, if you have it. Top the cheesy tortillas with the southwestern-scrambled eggs. Next layer the tortillas with spoonful or two of the warmed beans each, and salsa, sour cream and cilantro, as desired.
And, if you like heat as much as my husband does, sprinkle generously with "spicy flakes," a.k.a.: crushed red pepper, or jalapenos. (We go through a bulk bottle of "spicy flakes" just about every six months thanks to him ... ) Note: I took photos only to realize that my SD card was in the computer, not the camera. *Sigh ... guess I'll have to make these again next weekend!

I recommend serving these meals with fruit and wearing expandable pants. Happy brunch day!

3.22.2011

cornmeal-fried fish with curry and veggies

My husband digs fishing – especially deep-sea fishing. And thanks to him (and our friends and family with boats who are kind enough to include him in their trips, for which he gladly repays them with gas money and beer), our freezer is stocked with fresh-caught, minimally processed, white, flaky fish. It doesn't get better than that.

Tonight was a fish night. Said hubs was craving sushi from our local joint, and in an effort to save money and to one-up dinner from a nutrition standpoint, I made another Mark Bittman recipe, slightly modified to save time since it is a weeknight. Let's just say we weren't thinking about sushi after one bite.

Dredged in flour, cornmeal and curry, this pan-fried sheepshead was paired with sauteed snow peas and red onion, and a simple steamed side of zucchini and squash. Quite the tasty and healthy meal. Give it a whirl with any white fish or seasoning you like; you won't be disappointed.

Cornmeal-fried Fish with Curry and Veggies
  • 1 lb. white fish fillets, cleaned and deboned (we used sheepshead, which is a crustacean-eating fish that in turn tastes a lot like shrimp or lobster)
  • 1/4 c flour
  • 1/4 cornmeal (do not skip this!)
  • 1 tbsp curry or any other seasoning, such as Italian herbs or Old Bay
  • Salt and pepper
  • Olive oil
  1. In a shallow dish, stir the flour, cornmeal and seasonings. Dredge the fish fillets through it, pressing lightly to help the mixture stick.
  2. Heat a pan with olive oil over medium heat. When the oil shimmers, add a couple of fillets at a time, turning after about 4-5 minutes, or the breading is just starting to brown. Remove from pan and place on a plate lined with paper towels. Repeat until all fish is pan fried and serve immediately.
Serve with sauteed snow peas and sliced red onion, seasoned with salt and pepper, and a pinch of crushed red pepper. Enjoy!

3.19.2011

brown bag popcorn – a healthy, inexpensive snack


A whole-grain yummy food, homemade popcorn could be the easiest and cheapest snack to make for yourself. And it's faster to make than peeling an orange. Seriously. All you need is a paper bag, a little oil and basic seasonings, like salt and pepper.

To prove to you how inexpensive it is, popcorn kernels will cost you around four cents an ounce. Popular microwave brands cost three to six times as much, depending on the brand. Even better, each two-person serving pops up from 1/4 cup of kernels providing around four cups of pillowed popped corn for pennies (say that five times fast ... ).

So, here's how you do it, Mark Bittman style:

Brown Bag Popcorn
  • 1/4 c popcorn kernels
  • 1/4 tsp salt*
  • 2 tsp corn, vegetable or canola oil
In a brown paper bag, combine the kernels, salt and oil. Tightly fold the top over a couple of times and give it a good shake. To keep things neat, place the bag on a microwave-safe plate and nuke the bag for 2-3 minutes, or until there are few seconds between pops. Upon opening the bag, watch for any steam that might come out of the bag and season additionally, if needed.

*Try jazzing it up with superfine sugar for a sweet-salty mix, fresh-chopped herbs and Parmesan for a more refined taste, or season salt and cayenne pepper for a spicy treat. 

That's it! Believe me when I say you'll be planning movie nights around the popcorn, not the other way around.

(Another benefit of making it at home? Avoiding diacetyl, a naturally occurring chemical that shows up in beer, wine and other foods and added to microwave popcorn brands to make it smell and taste more buttery. The problem is when you inhale it: it can cause breathing problems and permanent lung damage from repeated exposure. To make matters worse, the commercially produced bags of popcorn are lined with flurotelemer to make them grease resistant. This unnatural chemical is similar to the coating put on dangerous non-stick Teflon pans and releases perfluorooctanoic [PFOA] – a known carcinogen – directly onto the kernels when heated. Mmmmm.)

Enough said: homemade popcorn is healthier and cheaper. And just as easy.

3.17.2011

inviting warm weather with simple summer kebobs

The weather has been fantastic. It demands flip flops and shorts, and long runs outside. And grilling outdoors in the evenings with a frosty cold beer or a good glass of wine.

Last night was such a night. I had a ton of veggies to use up and was craving them grilled – something I haven't had since the end of last summer. (Especially mushrooms. I love grilled, marinated mushrooms.)

In a half a shake of a lamb's tail we had cut chicken breasts into chunks and got them marinating in teriyaki. While the chicken was drinking in the flavor, we chopped onions, white mushrooms and green peppers into bite-sized pieces, and added cherry tomatoes to the pile. Then we strung skewers with the chicken and veggies and threw the on the grill.

Because I got home kind of late from the gym, we didn't have time to marinate the veggies like I usually do. So we improvised and whipped up some Italian dressing to brush the veggies with on the grill. Turned out to be quite tasty in a pinch. And extra delicious paired with fresh yellow rice.

While there's really no recipe for this, I can tell you that you should make it to woo summer into coming. If you don't like onions and peppers, use zucchini and squash. Don't like chicken? Use pork or beef. The possibilities are endless. Enjoy.

3.15.2011

easy inside-out chicken cordon bleu (for two)


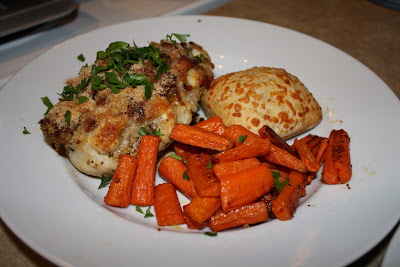
I love chicken cordon bleu, but it can be a very heavy dish. So when i saw this recipe on eatingwell.com (check it out if you haven't already, but only go for the top-rated recipes – trust me), I jumped on it. It's one of those meals you can easily make after work because it cuts all of the time-consuming steps that make chicken cordon bleu a special-occasion meal. And, thanks to my forever supply of Honey Baked Ham leftover from Christmas in the freezer, and surplus of carrots from my organic produce box, we had an easy meal on our hands – no trip to the grocery store required.

Here's how it goes:

Easy Inside-out Chicken Cordon Bleu for Two
  • 2 boneless, skinless chicken breasts
  • All-purpose chicken seasoning (or basic salt and pepper
  • 3 tablespoons shredded or chopped Swiss cheese (or Gruyère)
  • 1 tablespoon cream cheese
  • 2 tablespoons coarse dry breadcrumbs (whole wheat works fine)
  • 1 1/2 teaspoons chopped fresh parsley (or thyme ... or any chicken-friendly herb)
  • Olive oil
  • 2 tablespoons chopped ham (about 1/2 ounce)
  1. Preheat oven to 400°F.
  2. Sprinkle chicken with chicken seasoning. Combine cheese and cream cheese in a bowl.
  3. Heat a swirl of oil in an ovenproof nonstick skillet over medium heat. Cook the chicken until browned on both sides, about 2 minutes per side. Move the chicken to the center so the pieces are touching. Spread with the cheese mixture, sprinkle with ham, then top with the breadcrumb mixture*.
  4. Bake until the chicken is no longer pink in the center and an instant-read thermometer registers 165°F, 5 to 7 minutes.
*I burned my wrist doing this ... be careful!


Roasted Carrots with Cumin (thanks, Mark Bittman)
  • 1 to 1 1/2 pounds baby carrots, green tops trimmed, or full-sized carrots, cut into sticks
  • 3 tablespoons extra virgin olive oil
  • 2 teaspoons cumin
  • Salt and freshly ground black pepper
Heat the oven to 400-425°F. Put the carrots on a baking sheet and drizzle with the olive oil; sprinkle with the cumin and salt and pepper. Reflect on your play-dough days and mix it up with your hands (or think of it as a free manicure). Roast until the carrots are tender and browning, about 25 minutes. Serve right away ... or not. These sweet, roasted babies are good at any temperature.

3.13.2011

a new food hero: mark bittman of the "new york times" (and his nutty oatmeal cookies)


It started with Adelle Davis, Cooking Light, Food Network and Ellie Krieger. And then i found Michael Pollan (read one of my posts about him here) and he rocked my world in all sorts of new food-related ways. But there has been another – one that has been there all along, now that i think about it – who should have made my list of food heroes years ago. Food writer Mark Bittman of the New York Times. 

I'm a regular reader of the NYT online. I get the e-newsletter and it frequently draws me in to their website where I get sucked in to one article after another. Often I end up in the food section (after science and health news) where I enjoy reading about NYC restaurants or new recipes and ways to eat. I remember seeing Bittman on more than one occasion and enjoyed his healthy and tasty approach to eating. But it wasn't until Amazon suggested his "Food Matters" book based on my past purchases that I knew he was anything more than a columnist.

When I saw that he had a book – dozens, actually – dedicated to eating responsibly, healthfully and consciously, I knew I would like him. So I did what anyone would do: I stalked him. I found his website, his blog and his Facebook page and subscribed to him in as many ways possible. I loved him more and more. So I ordered two of his books (and got free shipping by doing so) – one, "Food Matters" is half cookbook-half eater's digest, and the second is a thick book stuffed with recipes. I devoured "Food Matters," and dog-eared more than 50 pages between its slim covers. (Admittedly I'm still thumbing through the larger cookbook, mostly distracted by its tinier cousin.)

Though I've only made one of the recipes so far (more to come, I promise), it was stellar. And even better, it's a guilt-free dessert. Nutty oatmeal cookies to be exact. Though they're still cookies, and pack a calorie punch, these babies aren't empty. They're filled with whole grains, nuts, fruit and fiber – and no butter. So next time you feel an urge for a sweet, make these. I had all of the ingredients in my pantry anyways. It's a perfect ending to any day.

Nutty Oatmeal Cookies

  • 1/2 c peanut oil (or vegetable or canola oil, or 8 tbs. unsalted butter, softened)
  • 1/2 c granulated sugar
  • 1/2 c brown sugar
  • 2 eggs (or 1/4 c applesauce)
  • 1 1/2 c flour (I did half whole-wheat pastry and half all-purpose flour)
  • 2 c old-fashioned rolled oats
  • 1 c dried fruit (I did half cranberries and half coconut flakes)
  • 1/2 c chopped walnuts (or pecans) 
  • 1/2 c chocolate chips (dark would be good)
  • 1 tsp ground cinnamon
  • 1/2 tsp ginger (optional, I did)
  • 1/4 tsp each: nutmeg and allspice (optional, I did)
  • pinch salt
  • 2 tsp baking powder
  • 1/2 c milk (or almond, rice or soy milk)
  • 1/2 tsp vanilla or almond extract
  1. Heat oven to 375.  Use an electric mixer to cream oil and sugars together; add eggs and beat until well blended.
  2. Combine the flour, oats, fruit, nuts, chocolate, spices, salt and baking powder in a bowl.
  3. Add vanilla to batter and turn the mixer on. Alternating with the milk, add the dry ingredients to the butter-sugar mixture by hand, a little at a time, stirring to blend.
  4. Place small mounds of dough about three inches aprt on ungreased cookie sheets.  Bake until lightly browned, 10-12 minutes.  Leave on the pan ~two minutes, then use a spatula to transfer the cookies to a rack to finish cooling.  Store in a tightly covered container at room temperature for no more than a day or two.
Yield: ~3 dozen cookies (batter and baked cookies can be frozen for a rainy day ... )

3.12.2011

BMLTs for lunch - in honor of the homemade mayo

Homemade mayonnaise has always been something I've wanted to tackle. I've heard it's lighter - as in the fluff factor, not necessarily calorie count - and tastier due to its freshness. So, with a little leftover bacon in the fridge, I set out to make bacon-lettuce-and-tomato sandwiches with homemade mayo for lunch.

It's another one of those recipes that seems daunting until you actually realize that it's just a basic emulsion of oil, egg and seasonings. (An emusion, just in case anyone needs an explanation, is just a mixture of oil and otherwise non-mixing ingredients that becomes cohesive after it's whipped to death. If it's done correctly, the ingredients won't separate.)  Apart from the muscle required to beat the emulsion into a fluffed frenzy, it's pretty easy and takes about 10 minutes to prepare. And you probably have all of the ingredients on hand. Here's the recipe I used, courtesy Alton Brown.

Homemade Mayonnaise
  • 1 egg yolk
  • 1/2 tsp fine salt
  • 1/2 tsp dry mustard
  • 2 pinches sugar
  • 2 tsp fresh lemon juice
  • 1 tbsp white wine vinegar
  • 1 c oil - canola, safflower or corn
  1. In a glass bowl, whisk together egg yolk and dry ingredients. Combine lemon juice and vinegar in a separate bowl then thoroughly whisk half into the yolk mixture.
  2. Start whisking briskly, then start adding the oil a few drops at a time until the liquid seems to thicken and lighten a bit, (which means you've got an emulsion on your hands). You'll notice tiny bubbles forming.
  3. Once you reach that point you can relax your arm a little (but just a little) and increase the oil flow to a constant (albeit thin) stream. Once half of the oil is in add the rest of the lemon juice mixture.
  4. Continue whisking until all of the oil is incorporated and mixture is light. Leave at room temperature for 1 to 2 hours then refrigerate for up to one week.
BMLTs: Crisp your bacon on top of the stove or in the oven and toast your bread. While that magic is being worked, tear and wash lettuce leaves (be sure the dry them) and slice tomatoes. Assemble, making sure to shmear the bread with extra homemade mayo, because it's homemade, and enjoy.

Oh, and in case you're wondering, the benefits of such efforts include not ingesting calcium disodium edta, which is is a chemical salt used to separate heavy metals from dyes and other substances. And, oh yeah, it's toxic and results in malabsorption of many vitamins. But it's in Hellmans, Kraft, and Dukes anyways. And commercial mayo gets even sketchier when you select reduced-fat, fat-free (shudder – what is mayo without fat?) and alternative-oil products.

On a completely different subject, I have come to realize that these foodie photos are so much better when taken with our SLR camera. The point and shoot is good for some things, but it just doesn't do the food justice. I vow to use the SLR from here-on-out. That is all.

3.02.2011

there's always time for taco salads and guacamole

Despite it being a long work day and a post-run meal, the hubs and I set out to make healthy, homemade taco salads and yummy guacamole for dinner. After all, we still needed to use up our leftover beer-can chicken from this past weekend!

This meal is actually pretty easy to put together and can be varied easily to your taste. Plus, I think the creation of the bowl is a neat part of the meal. I usually use a whole-wheat tortilla for that, partly because it's so much better for you and partly because you can't tell the difference once it's smothered in the yummy filling, cheese, salsa, sour cream and guac. Hey-o, taco salad night!

To start, you need to get your filling* going. Start with a pound of ground beef or chicken chunks and saute it (in olive oil if using chicken) until cooked; drain and remove from pan, wiping the pan free of any grease with a paper towel. (Skip this step if your meat is already cooked or if you want to go sans meat.) Saute about 1/2 of a large onion, chopped, in a little olive oil at medium heat in the same pan until it just starts to become translucent, and then add a couple of cloves of minced garlic. Season with salt and pepper and add the meat back to the pan. Add half a can each of drained corn and black beans. Lower the heat and season with about 1 1/2 tbsp chile powder, ~4 tsp of cumin, 1 tsp. oregano, a pinch of red pepper and a small handful of chopped, fresh cilantro. Salt and pepper to taste and give it a good stir. If it tastes a little weak, add more cumin and chile powder, and salt and pepper, until it's robust.

Preheat your oven to 400 derees. While waiting for the filling to cook, crumple two large pieces of foil into fist-sized balls. Place them on a jelly-roll pan. Lightly brush two* tortillas with canola or olive oil and sprinkle with chile powder. Drape them over the foil balls and bake in the over for five to ten minutes, until they become toasty-crisp. Remove from oven and allow to cool a few minutes. When the tortillas are removed from the pan, they'll hold their bowl shape.

Now, there a few things that I let the hubs take over cooking or making in the kitchen. Eggs, steak, grilled meats and guacamole make the list. An eater will get a true taste of culinary talent if this rule is strictly adhered to. In regards to his guacamole, I am the resident "taste tester," meaning that I eat half of the guac and chips in the process of directing "more lime!" or "more cilantro!" before it's put on the table. And that's the way both of us like it. A match made in heaven, eh?

In all seriousness, guacamole is pretty simple, really: just mix a couple of avocados with a little diced red onion, minced garlic, chopped cilantro and jalapeno pepper, the juice of one or two limes (depending on their juiciness), and some salt and pepper. Keep tasting until you get the ratios right. I recommend a good thick chip** for munching. We went for blue corn chips for this meal. (You can tell he's making the guacamole on the right because of how messy it is, haha ... love you, hubs!)

Place your bowls on a plate and stuff them with torn lettuce, the filling, salsa, sour cream, salsa, Mexican cheese, tomatoes, jalapenos or whatever your heart desires and enjoys. Filling, yummy and super healthy, this is a winner.


* Depending on how hungry you are and how much "stuff" you fill your bowl with, this filling will feed 4-6 people. I wrote two tortillas in this case, well, because there are two of us, knowing that we'll be eating leftovers (does the chicken count as left-over leftovers in this case?).
**In case you were wondering, here are my thoughts on corn chips as of late: I've been in favor of the organic version simply because of the GMO corn issue. I've investigated the baked vs. fried kind, and while the baked has no added ingredients or preservatives to artificially improve the taste, I still prefer the standard kind ... in moderation. :)